
The Alfresco platform has transformed the way people interact with enterprise information. Globally, companies can respond to changing business requirements and growing competition with ease, thanks to the Alfresco platform. Now, this digital business platform becomes more robust and powerful with a newer version. Now, you can update the existing Alfresco Community 4.2 to Alfresco Enterprise 5.2 and make your business more capable than ever.
Read the blog for How to Integrate Alfresco Login API With Standalone Native Android Application
Here we show how you can perform the migration from Alfresco Community 4.2 (PostgreSQL) to Alfresco Enterprise 5.2 (MySQL):
1) Stop Alfresco 4.2 server and take a backup of PostgreSQL database in a dump file.
Steps for taking dump file:
- Start only Postgres service in 4.2
- Create blank file called “42dump” on desktop (without any file extension)
- Get Alfresco DB properties from \Alfresco_Installation\tomcat\shared\classes\alfresco-global.properties file
- Run this command: pg_dump -p 5433 -U alfresco -h localhost alfresco > “C:\Users\XXXX\Desktop\42dump”
- Check dump file size
- Reference: https://www.postgresql.org/docs/9.1/static/backup-dump.html
Or use pgadmin tool – https://www.pgadmin.org/download/pgadmin-4-windows/
2) Install new Alfresco Enterprise 4.2.8 with PostgreSQL database.
3) Copy <<ALFRESCO_HOME>>/alf_data/contentstore and <<ALFRESCO_HOME>>/alf_data/contentstore.deleted folders from directory root of old instance to new instance.
4) Restore data in PostgreSQL database of the new instance from previously created dump file (Refer Step1)
Steps to Restore DB:
- Start Postgres service of 4.2.8 (fresh installation)
- Update \Alfresco_Installation_fresh\alf_data\postgresql\pg_hba.conf – Ipv4 and IPv6 – method should be “trust”
- Get DB Properties from alfresco-global.properties file.
- \Alfresco_Enterprise_5.2\Alfresco_Installation_fresh\postgresql\bin>psql -h localhost -p 5432 -U postgres alfresco < “C:\Users\XXXXX\Desktop\42dump”
- Update \Alfresco_Installation_fresh\alf_data\postgresql\pg_hba.conf – Ipv4 and IPv6 – method should be “md5”
5) Start a new instance of Alfresco.
6) Validate server is running and logs are error free.
7) Install new Alfresco Enterprise 5.2 with PostgreSQL database. (Install it in the different folder than existing ACS 5.2)
8) Validate default 5.2 and make sure it runs well with the OOTB features like document preview, download/upload etc. It is required to validate to distinguish the issues between pre-migration and post-migration.
9) Again follow steps from 3 to 6 with the new alfresco 5.2.
10) Verify all migrated content including metadata is present in the new instance.
11) On User dashboard, there might be broken icons before each file name. And you won’t be able to upload the document. That is due to the licensing key is not uploaded. That step can be performed post SQL server migration.
Stop the tomcat server of the new instance.
12) Create Alfresco user in SQL Server and Also create the alfresco database.
Connect with SQL Server:
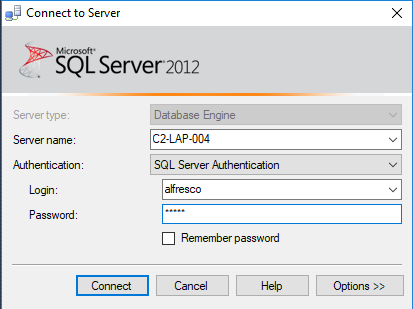
Enable Snapshot isolation
ALTER DATABASE alfresco SET ALLOW_SNAPSHOT_ISOLATION ON
13) Configure the newly created database in the new instance.
Make a copy of alf_data directory(for backup purpose).
In alf_data folder, delete content, content deleted folders. Under solr4 folder, delete all 3 folders. It’s fine to delete them as Alfresco will create them after the restart.
Use this link for Solr reindexing: https://docs.alfresco.com/5.2/tasks/solr-reindex.html
14) Place sqljdbc4-2.0.jar in tomcat\lib. Here is the link to download the jar.
15) Make sure alfresco-global.properties of the new instance has SQL server configuration and then Start tomcat server of the new instance to let the Alfresco create a schema in the Alfresco database of SQL s
16) After start-up, verify the logs and make sure they are error free. The schema should also be created by Alfresco in the database.
Disable all constraints and triggers of the database. Below script can be used.
17) Select the database name before executing any script.
USE alfresco (In case DB name is different like alfresco9 – USE alfresco9)
EXEC sp_MSForEachTable 'DISABLE TRIGGER ALL ON ?'
GO
EXEC sp_MSForEachTable 'ALTER TABLE ? NOCHECK CONSTRAINT ALL'
GO
18) Delete all rows of every table.
Select database using command –
USE alfresco
EXEC sp_MSForEachTable 'DELETE FROM ?'
GO
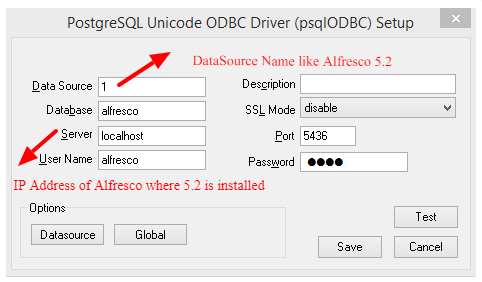
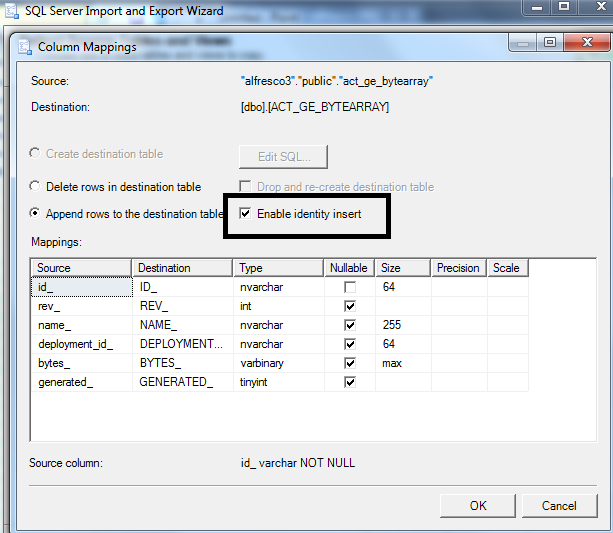
19) Manually transfer each table data (rows) from the PosgreSQL database to a new instance using SQL Server Import and Export Wizard.
Create System DSN in ODBC Data Sources. Control Panel >> Administrative Tools >> ODBC Data Sources (32 Bit)
If psqlOdbc is not listed, install the driver for 32 bit.
Change configuration where SQL server is installed (Do it only if import data gives conversion error).
C:\Program Files (x86)\Microsoft SQL Server\110\DTS\ProviderDescriptors\ProviderDescriptors.xml for OdbcConnection if there is column mismatch.
<dtm:ColumnSchemaAttributes
     NameColumnName = "COLUMN_NAME"
     OrdinalPositionColumnName="ORDINAL_POSITION"
     DataTypeColumnName = "TYPE_NAME"
     MaximumLengthColumnName = "LENGTH"
     NumericPrecisionColumnName = "PRECISION"
     NumericScaleColumnName = "SCALE"
     NullableColumnName="NULLABLE"
     NumberOfColumnRestrictions="4"
/>
In case there is any issue in saving the design change, follow this:
Go to SQL Server management studio > Tools > Options > Expand designers > Click table and database designers > clear checkbox “Prevent saving changes that require table re-creation”
20) Enable all constraints and triggers of the database.
Select database using the command –
USE alfresco
EXEC sp_MSForEachTable 'ALTER TABLE ? CHECK CONSTRAINT ALL'
GO
EXEC sp_MSForEachTable 'ENABLE TRIGGER ALL ON ?'
GO
21) Copy content and content deleted folder from alf_data(4.2.8)to main(5.2) alf_data
22) Start the server of the new instance.
23) Verify logsagainfor error and found old contents as it was in the old instance of Alfresco.
Update Licence key through the admin console.
Well, that’s it for the said migration process!
At Concentric, we strive to address all ECM content or database migration and customization requirements with the Alfresco platform. Feel free to contact us with your business needs and we will provide you with a customized solution.